How to Add Products and Blog Posts in WordPress
A step by step guide to managing WooCommerce products, categories and WordPress posts
This guide explains how to create product categories, publish products, organize blog categories and manage posts from the WordPress dashboard. It is intended for website owners and content managers who use WooCommerce but do not need to edit theme code.
Before you begin. WooCommerce must be installed and your WordPress account must have permission to manage products and posts. The screenshots in this guide come from a localized dashboard, but the menu positions and workflow are the same in the English interface.
Recommended Blog Settings
| Field | Recommended Content |
| Blog title | How to Add Products and Blog Posts in WordPress |
| URL slug | how-to-add-products-and-blog-posts-in-wordpress |
| Focus keyword | add products in WordPress |
| SEO title | How to Add Products and Blog Posts in WordPress |
| Meta description | Learn how to create product categories, publish WooCommerce products, organize posts and manage WordPress content step by step. |
1 Sign In to the WordPress Dashboard
Open your WordPress administration URL, usually your domain followed by /wp-admin/. Enter your authorized username or email address and password, then select Log In. Never publish administrator credentials in a public guide or share them through an unsecured channel.
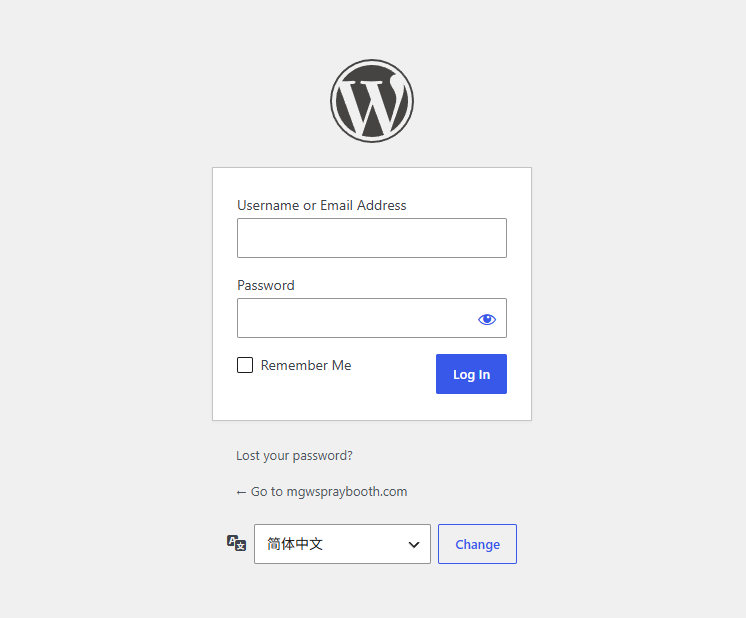
Figure 1 WordPress sign in screen
2 Create a Product Category
Product categories keep the catalog organized and help visitors browse related products. Create the category structure before adding products whenever possible.
1. In the left navigation menu, go to Products > Categories.
2. Review the existing categories before creating a new one to avoid duplicates.
3. Complete the category fields and select Add new category.
Product Category Fields
- Name: Enter the public category name in English, for example Car Spray Booth.
- Slug: Use lowercase letters and hyphens, for example car-spray-booth. Keep every slug unique.
- Parent category: Choose None for a top-level category. To create a subcategory such as Accessories, select Car Spray Booth as its parent.
- Description: Add a short explanation when the theme displays category descriptions or when the category needs supporting SEO copy.
- Thumbnail: Upload a relevant image if the theme uses category cards or category archive images.
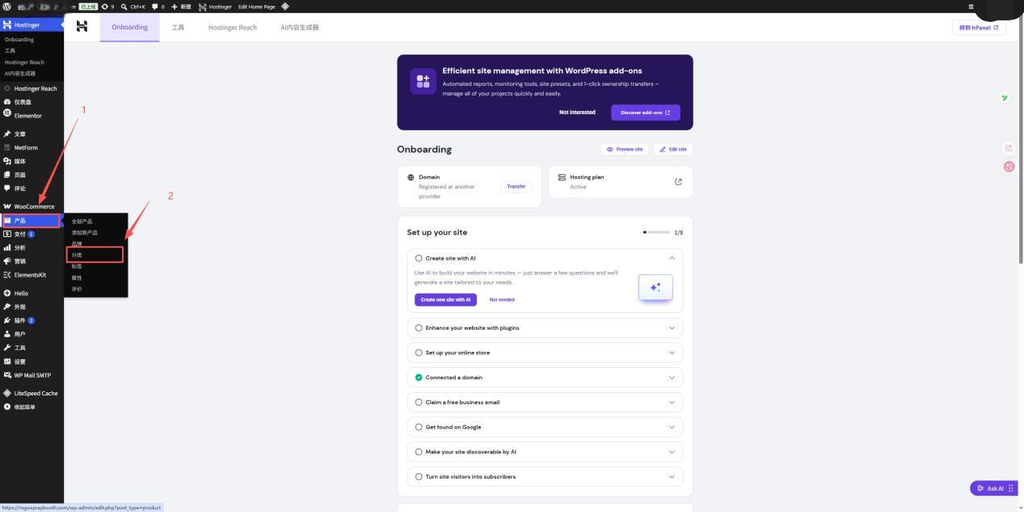
Figure 2 Open Products and select Categories
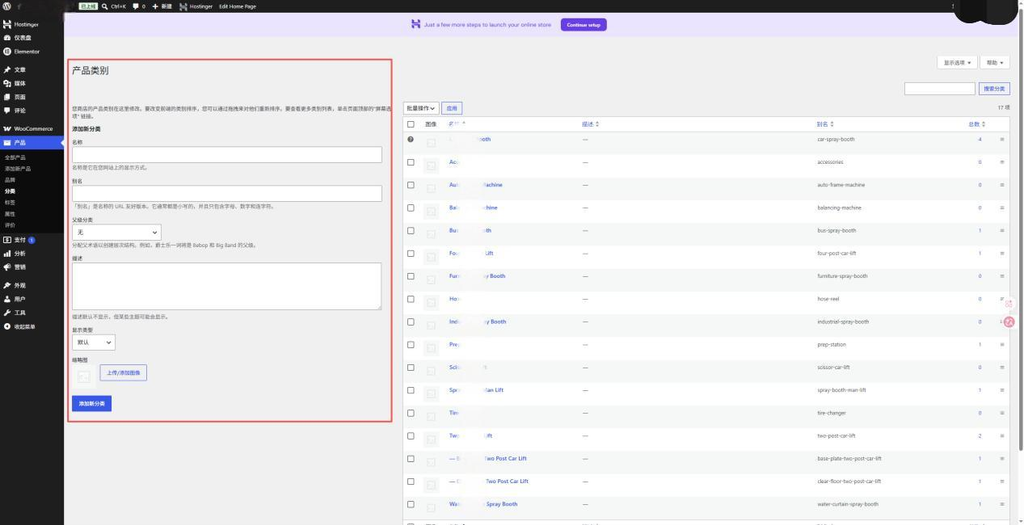
Figure 3 Complete the product category fields
Edit an Existing Category
Use the category list on the right side of the screen to edit a category. Select Edit for the full settings page or Quick Edit to change the name and slug. Check the resulting URL after changing a slug because existing links may require a redirect.
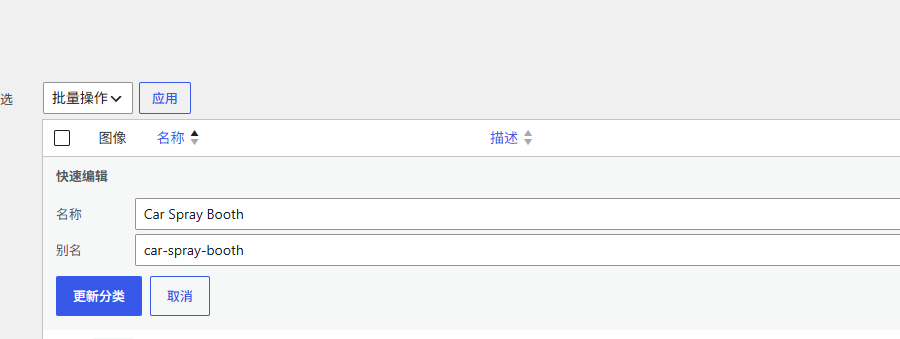
Figure 4 Use Quick Edit to update a category name or slug
3 Add a New Product
Go to Products > Add New. Enter a clear product name first, then complete the product information before publishing. The exact layout may vary by WooCommerce version and installed plugins.
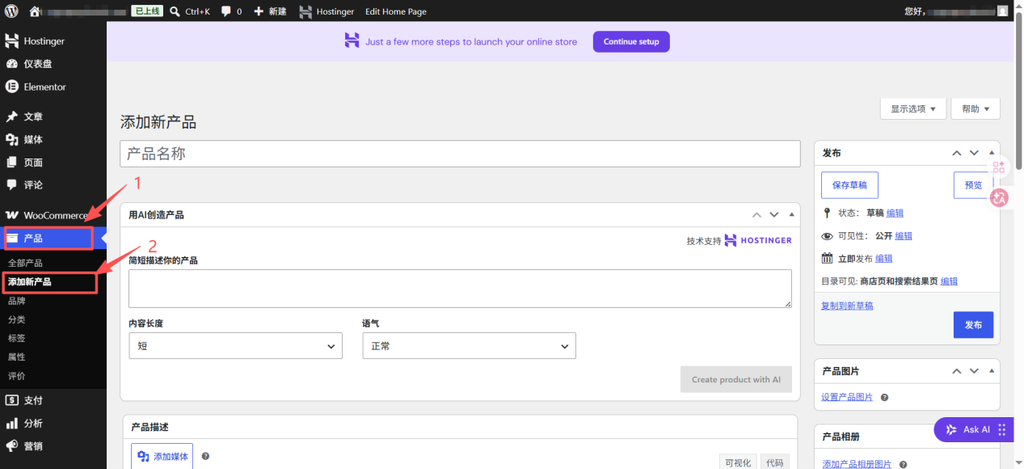
Figure 5 Open the Add new product screen
Complete the Product Information
- Product name: Use a descriptive, customer-facing title. Avoid adding unnecessary promotional wording.
- Long description: Add the main product information, specifications, features, applications and any comparison or technical tables.
- Product data and SKU: Select the correct product type and enter a unique SKU. Do not reuse the SKU of another product.
- Product image: Upload the primary image shown on product cards and near the top of the product page.
- Product gallery: Add additional images showing details, dimensions, applications or different views.
- Product categories: Choose the most specific relevant category. Select a parent category only when it also helps visitors browse the catalog.
- Permalink and slug: Use a short lowercase slug with hyphens. Do not change it casually after the page has been indexed.
- Short description: Write a concise summary. Most WooCommerce themes display it beside the main product image, although placement depends on the theme.
- Featured status and visibility: Confirm whether the product should appear in search, category pages and featured sections.
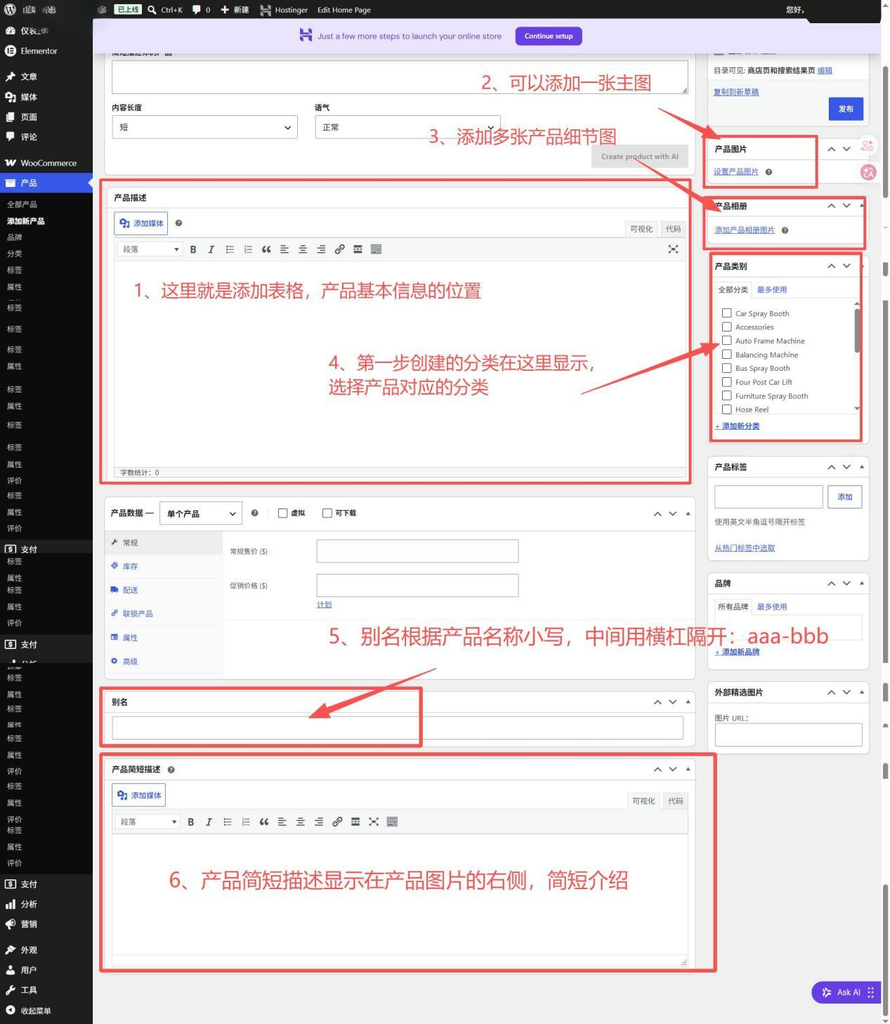
Figure 6 Main product fields in the WordPress editor
Review and Publish
1. Preview the product page on desktop and mobile.
2. Check the product name, SKU, category, images, technical data and links.
3. Add meaningful alt text to each informative image.
4. Save as Draft if the content still requires approval. Otherwise, select Publish.
4 Manage Existing Products
Go to Products > All Products to view the full catalog. From this screen you can open a product, use Quick Edit, change status, update categories or move an obsolete item to Trash.
- Edit: Open the complete product editor.
- Quick Edit: Change basic information such as the name, slug, SKU, category, visibility or publication status.
- Bulk actions: Apply an approved change to multiple selected products. Review the selection carefully before updating.
- Trash: Remove a product from the public catalog without permanently deleting it immediately.
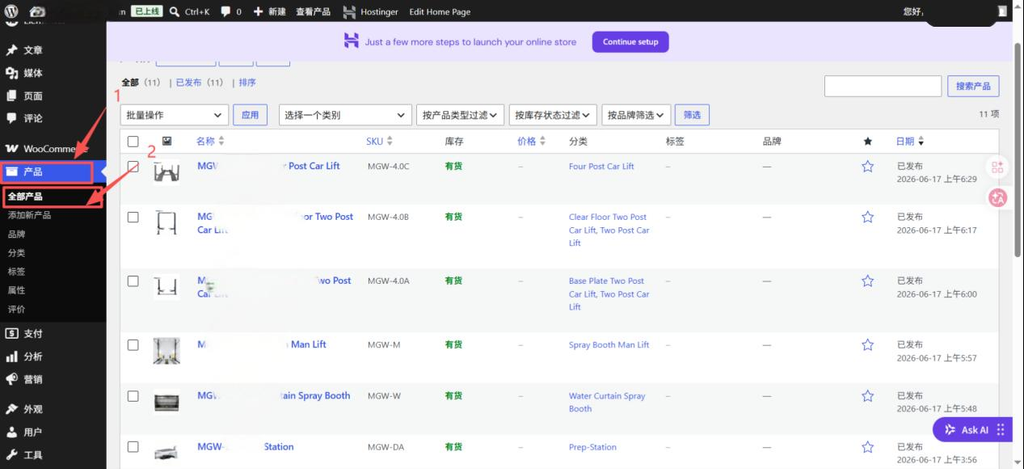
Figure 7 View and manage all WooCommerce products
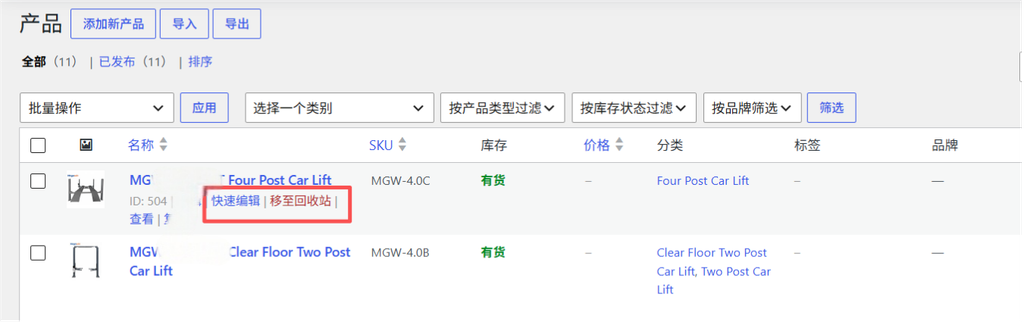
Figure 8 Update basic product details with Quick Edit
5 Create a Blog Category
Blog categories help readers and search engines understand the main subjects covered by the website. Go to Posts > Categories and review existing categories before adding another one.
- Name: Enter a clear topic name, for example Maintenance Guides.
- Slug: Use lowercase letters and hyphens, for example maintenance-guides.
- Parent category: Choose None for a main category or select an existing category to create a subcategory.
- Description: Explain what readers will find in the category. Keep the description specific and avoid repeating another category’s purpose.
Select Add new category to save it. Existing categories can be updated with Edit or Quick Edit. Avoid leaving published posts in Uncategorized.
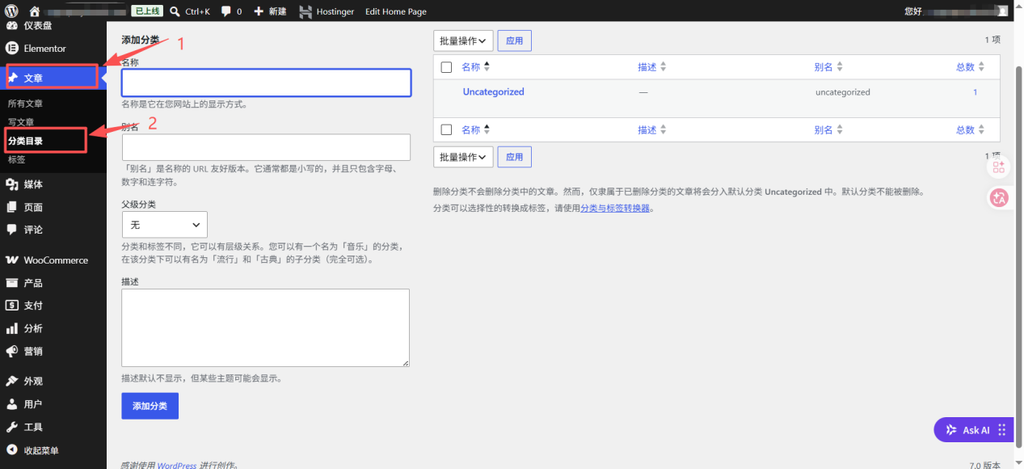
Figure 9 Create and manage WordPress post categories
6 Write and Publish a Blog Post
Go to Posts > Add New, then complete the following items:
1. Write a specific post title that accurately describes the article.
2. Add the article content using headings, short paragraphs, lists and relevant images.
3. Set a short, readable URL slug in lowercase with hyphens.
4. Select the most relevant post category. Avoid assigning unrelated categories only to increase visibility.
5. Add a featured image and descriptive alt text.
6. Complete the excerpt and SEO title and description if an SEO plugin is installed.
7. Preview the article and test all internal and external links.
8. Save the article as a draft for review or select Publish when it is ready.
7 Manage Existing Blog Posts
Go to Posts > All Posts to find published articles, drafts, scheduled posts and items in Trash. Use filters or search to locate a post quickly.
- Edit: Open the full post editor to revise the article.
- Quick Edit: Update the title, slug, category, tags, author, date or publication status without opening the full editor.
- Draft to Published: Only change the status after the article has been reviewed. Select Update to save the new status.
- Schedule: Choose a future date and time when the post should be published automatically.
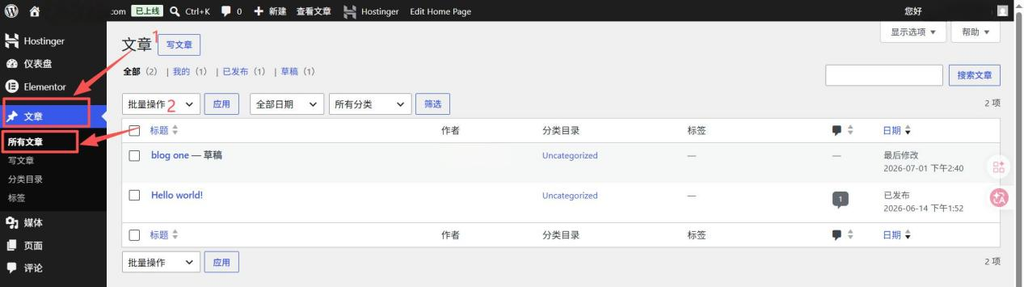
Figure 10 Locate the WordPress post management tools
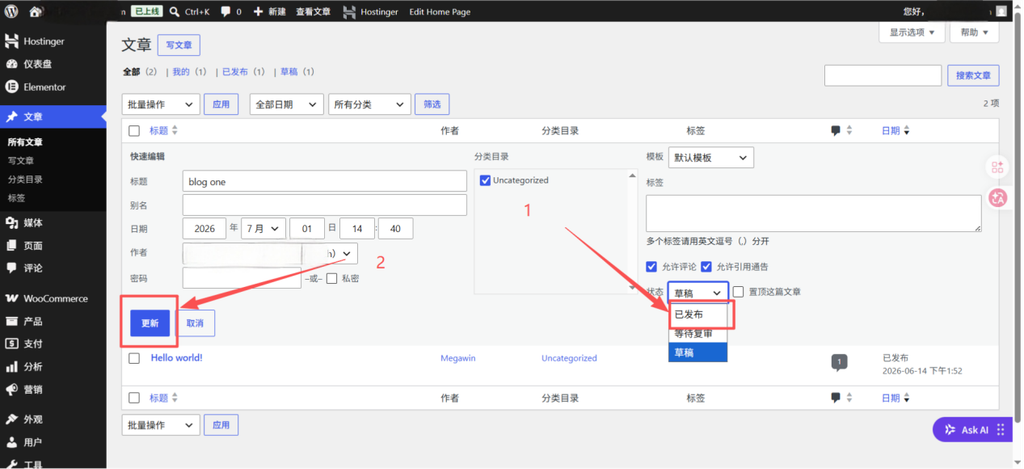
Figure 11 Change a post status with Quick Edit
Final Publishing Checklist
- The title is accurate and easy to understand.
- The slug is short, English-only, lowercase and unique.
- The product SKU is unique and entered in the correct field.
- The correct category has been selected.
- Images are compressed, appropriately sized and include useful alt text.
- Product specifications and contact details have been checked.
- The page has been previewed on desktop and mobile.
- All buttons, downloads and internal links work correctly.
- The content is saved as Draft when approval is still required.
Conclusion. A consistent publishing workflow makes the catalog easier to manage and reduces duplicate categories, broken URLs and incomplete product pages. Create the structure first, use unique slugs and SKUs, preview every page and publish only after the final checks are complete.